Your phone rings dozens of times every day, but does it ever truly sound like you? Most people stick with default tones, never realizing how much personality a simple sound can express. custom ringtone audio editing is the perfect way to turn your favorite song, a memorable quote, or a unique sound into a signature that instantly stands out.
A custom ringtone isn’t just about style; it helps you recognize calls faster and makes every notification more enjoyable. Whether you use Android or iPhone, personalizing your ringtones is easier than you might think and surprisingly fun.
If you want your phone to reflect your taste and feel truly personal, keep reading and discover how to do it step by step.
How to Create a Custom Ringtone on Your iPhone?
Creating a unique sound for incoming calls on iOS is one of the most satisfying ways to take control of your device, and learning custom ringtone audio editing on an iPhone opens the door to real personalization.
Apple may seem restrictive at first, but with the right approach, you can turn almost any audio clip into a polished ringtone that works perfectly with the system. Whether you want music, a voice clip, or a subtle tone, the process is structured, reliable, and designed to keep audio quality high.
- Choose the right audio source.
Start by selecting an audio file you genuinely enjoy hearing multiple times a day. This can be a song you own, a podcast snippet, or a short audio recording. Keep in mind that Apple limits ringtone length to about 30 seconds, so longer tracks must be trimmed before use. This step is essential for successful custom ringtone creation because iOS will not accept files that exceed its duration rules.
- Edit and trim the audio file.
Use an audio editor on your Mac, iPhone, or an online service to cut the exact section you want. Precision matters here: choose a segment with a clear beginning and a smooth ending so it doesn’t feel abrupt when someone calls. Many users prefer to make ringtones from a song by selecting the chorus or a recognizable instrumental hook that starts strongly.
- Convert the file to the correct format.
Apple requires ringtones to be in M4R format. If your file is currently MP3 or WAV, you’ll need to convert it. This conversion step ensures compatibility and prevents syncing errors later for custom ringtone audio editing. During this stage, you are effectively performing an MP3 to ringtone transformation, which is a critical technical requirement for iOS devices.
- Transfer the Ringtone to your iPhone.
Once converted, add the M4R file to your iPhone using Finder on macOS or another supported transfer method. This is often described as an iTunes ringtone alternative, since modern versions of iOS no longer rely on iTunes for ringtone syncing. Make sure the file appears under the Tones section when your device is connected.

- Assign the Ringtone to your device.
On your iPhone, open Settings, navigate to Sounds & Haptics, and select Ringtone. Your newly added tone should appear at the top of the list. This moment completes the custom ringtone iPhone experience, as your sound is now fully integrated into the system.
- Fine-tune for calls and alerts
Beyond calls, you can assign the same tone to specific contacts or alerts if desired. This flexibility allows you to distinguish important calls instantly. For users following a full iPhone ringtone tutorial, this final adjustment step ensures your custom sound works seamlessly in real-life situations.
How to Create a Custom Ringtone for Your Android?
Android offers more freedom when it comes to audio customization, making it ideal for users who want custom ringtone audio editing quickly and with fewer restrictions. The platform supports multiple file formats and allows direct access to internal storage, which simplifies the process.
Whether you’re using a flagship device or a budget phone, Android gives you powerful tools to shape how your phone sounds.
- Pick an audio clip that fits your style.
Begin by selecting an audio file stored on your device or downloaded from a trusted source. Android supports MP3, OGG, and WAV formats, giving you flexibility. This openness is why many users prefer phone ringtone customization on Android compared to other platforms.
- Use a dedicated editing tool.
Install a reliable ringtone maker app from the Play Store to trim and enhance your audio. These apps allow you to adjust fade-ins, fade-outs, and volume levels, ensuring the ringtones sound clean even in noisy environments. Editing directly on your phone also enables a ringtone without a computer, which is perfect for users who want everything done on mobile.
- Save the file to the correct folder.
After editing, save the Ringtone to your device’s Ringtones directory. Proper file placement ensures Android recognizes the sound automatically. This step is crucial for anyone aiming to master creating a custom ringtone Android setup without system errors.
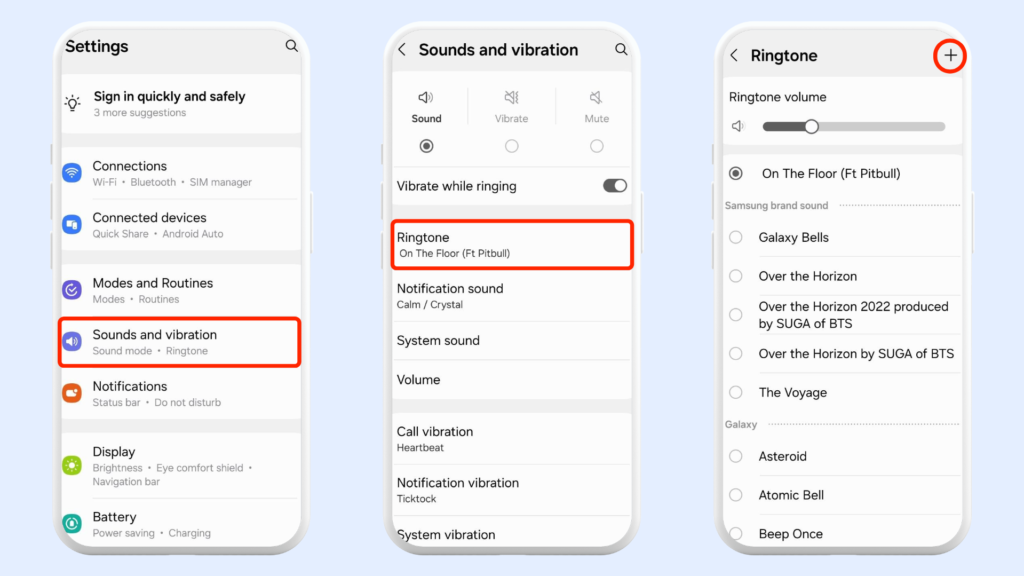
- Apply the Ringtone through system settings.
Open your phone’s settings menu and navigate to Sound or Audio options. From there, access the ringtone settings on Android and choose your newly created file from the list. Android instantly applies the change, so you can test it right away.
- Customize alerts and notifications.
Android allows different sounds for calls, messages, and apps. Assigning unique tones to notification sounds helps you identify alerts without even looking at your screen. This level of control is ideal for productivity and everyday convenience.
- Optimize overall sound preferences.
Finally, review your sound settings on your mobile to balance volume levels and vibration patterns. These adjustments ensure your Ringtone complements your daily environment, whether you’re at work, school, or home.
Best Audio Length & Sound Design Tips for Ringtones
For custom ringtone audio editing that feels polished and practical, paying attention to audio length and design is just as important as choosing the right sound. A well-designed ringtone should be noticeable without becoming annoying.
- Keep the duration short and effective: Ringtones between 15 and 20 seconds work best because most calls are answered quickly. For example, a short instrumental hook is more effective than a full chorus.
- Make the first few seconds instantly recognizable: The opening should be clear and engaging, since many people decide to answer within the first three seconds. A strong beat or melody at the start helps achieve this.
- Avoid heavy bass and overly complex layers: Phone speakers struggle with deep bass, so a simple, mid-range sound will be clearer. A clean piano note, for instance, often sounds better than a bass-heavy EDM drop.
- Use smooth transitions and gentle fade-ins: Sudden loud sounds can feel jarring. A soft fade-in makes the Ringtone feel more natural and pleasant in everyday situations.
These small design choices can turn an ordinary sound into a ringtone that is both unique and enjoyable.
Common Problems & Fixes When Creating Custom Ringtones
By custom ringtone audio editing, you may run into a few common issues that can usually be fixed with simple adjustments rather than complex troubleshooting. Understanding these problems in advance helps you avoid frustration and saves time.
- The ringtones do not appear in the sound list. This often happens when the audio file is saved in the wrong format or placed in an incorrect folder. For example, an iPhone will ignore files that are not converted properly, while Android may not recognize tones saved outside the Ringtones directory.
- The sound plays too quietly during incoming calls: Low volume is usually caused by poor audio quality or an unbalanced mix. A song clipped from a live recording, for instance, may sound fine with headphones but become barely audible through phone speakers.
- The ringtones disappear after a system update: Software updates can reset sound preferences or temporarily hide custom tones. Re-selecting the Ringtone from settings usually restores it without needing to recreate the file.
- The ringtones stop abruptly or sound incomplete: This issue is often linked to improper audio trimming. If the cut ends too suddenly, the sound may feel broken, which is why smooth fades are recommended.
At the end
Learning custom ringtone audio editing is more than a technical skill; it’s a simple way to express individuality and improve daily phone interactions.
By choosing the right audio, editing it carefully, and applying it correctly, you gain full control over how your device communicates with you. A thoughtful ringtone can help you personalize smartphone experiences, recognize calls instantly, and even enjoy your device more throughout the day.
Now it’s your turn to take action; Try creating your first custom ringtone today and feel the difference immediately. Share your experience or favourite ringtone idea in the comments. If this guide helped you, bookmark it and share it with friends who love customization.